Friday, November 30, 2018

Snow Gear See Through card


I created a mouse that wants to go snowboarding. In order to put his gear on, the recipient must close the card. I think the helmet fits him perfectly. 


The equipment and sentiment are from Simon Says Stamp's Snow Gear set. The mouse is from Mama Elephant's Lunar Animals set. I colored using copic markers in a fall orange color, but I feel it is still a winter card since snow came so early this year. 

I die cut the scalloped circle from the front of the card and adhered acetate on the back. I die cut two more gray panels to make the white snow stand out more and ensure a 'clean and simple' look.

I cut two helmets and glued them to each side of the acetate ensuring that when the card was closed they fit in the correct spot over the mouse. To do this, it was easiest to put the helmet on the mouse (colored side down) and put a drop of glue on it.. then, I carefully closed the card. Let that dry. Then, I knew exactly where to line up the helmet for the front of the card.

I embossed the sentiment using Ranger Tinsel Embossing Powder. In some of my other posts I have specific details for embossing-- it is fun and really adds a lot when you view the card in person!

Hope you enjoyed this see through card :)

Challenges:

Monday, November 19, 2018

Origami Squirrel Golden Acorns

Hello! Please follow me on instagram at @Coolpaperart for more fun pics!
Today I have a unique card to share using some origami. The squirrel can be taken out as a surprise gift for the recipient!


Folding the squirrel took a bit of time. The designer is John Montroll and I grew up with many of his origami books- he is a great artist. I messed up the first one b/c the paper was a bit too small. If you fold and refold the same spots, sometimes the paper will wear down and make a hole. The larger the paper, the easier it is to work on details, like little arms and feet etc, so I used a larger square. The end product was actually a good size for the 6x6 inch card. 

For the background, I used an acorn stencil from Echo Park and used several different pastes on it. I used a variety of products from Viva, Lindy's Stamp Gang and Tim Holtz. The Viva pastes were ready to go, but for the gold and another shade of brown, I took the sprays and added them to some white texture paste that I had. 

 I embossed the sentiment (from Simon Says Stamp seasons set) on vellum and adhered it to the back of the paper, leaving a bit of space for my squirrel to fit behind it. Then I popped it onto a piece of brown cardstock from Bazzil.  

Happy Autumn!

Challenges:


Friday, November 9, 2018

One Layer Wedding Card

Good morning. Today I am sharing a one layer stamped wedding card.


Technically, the dove stickers add a bit of dimension, but stamping-wise, it is still a one layer card.. and with no masking necessary thanks to this awesome stamp set! The layered stamp set is called Fresh Cut Wreath by a company called WPlus9.

I scored my card so the front would be a little shorter- this enabled me to add some nice glitter tape to the inside. It can be seen when the card is closed and also 'classes' up the inside of the card when the bride and groom open it up- They are fancy like that and deserve it :)

If there is a washi tape or something I really want to use on a card, I like to use this technique. *Sometimes* though, I have accidentally scored my card wrong and used this trick to save the card.. don't tell anybody... haha.  If you prefer, you could always trim the card down a bit.

Anyway, thanks for stopping by and please check back soon!

Wednesday, October 24, 2018

Watch Your Step!

I thought this was a creepy, yet fun card to give in October. Would be good for the person in your life that loves creepy or spooky things. 


The background is blended using sand colored distress inks and a bit of brown. The scorpion is from Hero Arts' Desert Fox stamp set. I stamped using Versamark ink, a glue-like ink, and then used Brutus Monroe's black fine embossing powder on top. Some of my earlier posts have specific directions for heat embossing, but I recommend you treat the area first with an anti-static tool so powder only sticks to your image. I did a few rounds of embossing. Then, I used some purple embossing powder from Lindy's Stamp Gang for the unique scorpion. The matching sentiment comes from Paper Smooches. 

Challenges:

Tech Ninja

Hi, I made a birthday card for my tech-ninja friend. He is a computer wiz with his trusted tool, his laptop.


I used Altenew's Ninja Invasion layering stamps and used a stamp positioning tool to make sure that the swords were aligned properly. 
I then created a mask of each ninja with a post it note and covered them up. Then, I placed the circuit board stencil from ACMoore on top. I sprayed lightly with some green spray from Lindy's Stamp Gang and removed the stencil. 
The sentiment is simple, so that the ninjas steal the show. I stuck it to a piece of black design paper from Blick and then adhered it to my card-base to create a top folding card.  

Challenges: 

Monday, October 22, 2018

Water-colored Vampire and Blood-Moon Shaker Card


Halloween will be here in no time so I am sharing a Vampire Shaker Card I made. The eerie "Blood Moon" was inspired by these cool Red Beads I found at a jewelry shop. 
I used Tim Holtz' Bat Stencil and some Black Acrylic Paint + Paste. I will be using some nicer pastes in the future, but this mix is an effective and cheap technique. I let it dry and cut it down to size. Be sure to clean your stencils with hot water afterward so they don't dry on the stencil.. using soap is OK too.

After cutting the hole for the Shaker element, I filled it with Beads + Sequins and adhered it together behind some Black Glitter Card-Stock. You can get 'Shaker Pouches' at a lot of places now, and it makes it easier to make cards like this. This pouch is an old one from Impression Obsession, but I know Simon Says Stamp has some too. Otherwise, you can use Acetate for the window and Foam Tape along the edge to keep the components in place.  


The vampire is from a La-La-Lands-Crafts stamp. I used an Anti-Static Tool to prep the area, then stamped him with VersaFine Onyx Black Ink. Then, I used Clear Embossing Powder. If you get some powder where you don't want it, you can take a dry paintbrush and brush it off. Fingers work too, but a brush works better, trust me. I did the sentiment the same way. The final step is to heat set it with a heat tool and it will become permanent. When it melts, it turns shiny. Note that you can not use a hair-dryer, it needs to be a special heat tool: I personally use a Precision Heat Embossing Tool by Hero Arts and it says "Wagner" on the side.

Then, it was time to water-color! My set is from Kuretake (Gansai Tambi) and I like that the colors are highly pigmented. I took my time in-between layers and let them dry, thus building more saturated color. I also used progressively darker shades to get the shadow effects. I used gold on the buttons and staff; it is hard to tell from the pic, but it shines a lot. I used some Glossy Accents by Ranger on the boots and bats. Then, I cut him out and stuck him under his Blood Moon. 

Hope you enjoyed my creation. I might use the Blood Moon idea again with another concept I thought of based on the Avatar TV show..... Stay tuned... True fans will already know where I am going with this...! 
:D
-John

Wiggling Monster

Happy Halloween- This monster's feet wiggle and the inside of the card says... wait for it... 
 "Trick or Treat, Smell My Feet"


The "My Feet" Set from Art Impressions has everything you need for a not-so-scary-monster card. You can buy extra "action wobblers" as well. I chose my colors so that they would be complimentary and match the decorative foil paper. 
My Instagram, @CoolPaperArt, has a video of the feet in action, along with the inside sentiment if you would like to see it in action!

Monday, October 8, 2018

Autumn Leaves

It's Official

So, it is officially Fall and that means I need to post an Autumn colored leaf card before diving headfirst into zombies, vampires and werewolves. This is a punny card for my mom depicting my sisters and me. Mom taught grammar as well so she will be happy to know I used that last "me" properly.
The sentiment: "We can't be-leaf what a great mom you are- Happy Fall".


Cool right? For the front I used an old leaf stencil (from AC Moore) and pounced brown ink through it. Sprayed it with some gold spray, cut it out and set it aside. I used autumn colored distress inks on a sheet of white paper, sprayed some water on it and dried it off after 2 seconds.. then, I used a leaf embossing folder to create the textured background. 

For the inside of the card, I used stamps by The Greeting Farm. I really love this style of artwork from TGF- the characters are a bit taller and more evenly proportioned. I emailed TGF to try and get more stamps made in this style. They said that they tend to do the smaller characters so they can fit more images on a stamp set.. They added that they might make more in the future..  Please feel free to email them and demand they give the masses what they want... Or what I want anyway... lol.  I definitely think these characters were worth the money, and I'm glad I bought them a while ago as they seem now sold out. The sets I used are named "My Sunshine" and "Together Anywhere". You can still find them on ebay etc. Contact TGF or browse their other stamps here.

I also used Glossy Accents on my sisters' dress, boots and scarf. All those leaves were die cut out using a die from Impression Obsession named Oak Leaves and Rake. It is an awesomely useful set, though I didn't use the rake this time. 

Hope you enjoyed and stop by again. Thank you.

Challenges: 


Tuesday, September 11, 2018

One Last Summer Paradise Card

Fall is still over a week away but I know everybody has pumpkin spice on their brain! I wanted to show one last card for Summer. I really love macaws, and used the Color Layering Parrot Stamp Set from Hero Arts. 


I stamped the body in Red and Blue ink. I then stamped the second and third layer in Versamark ink and embossed with WOW embossing powders.  I stamped the beak and feet in black ink and cut out a few leaves I made as well. I used some green shades of Distress Inks on the background. How to achieve the spots and how to emboss really well are discussed in more detail in an earlier post of mine. I really wanted to make a macaw with red, though I love the yellow/blue variety featured on this USPS Pets Stamp. I also used a leaf embossing folder on a sheet of green paper for the back of the card. I am happy with how it turned out!


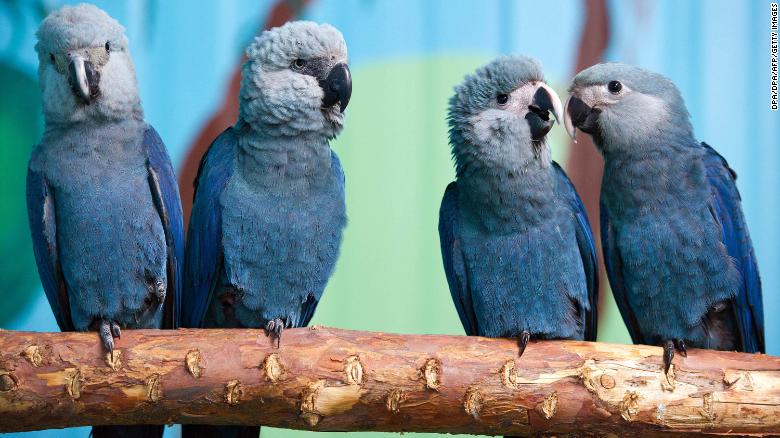
I will need to make another blue parrot card soon to honor the Spix Macaw. It has sadly been declared extinct in the wild. Here is a pic of the beautiful birds and a link to the World Wildlife Fund.

Spix's macaws sit on a branch in their aviary at the Association for the Conservation of Threatened Parrots in Germany.

Monday, September 3, 2018

HB2U Feathers

Hi guys, today I am sharing a clean, simple, embellishment-free birthday card.
Sometimes simplicity is the best way to go. Of course, I still make cards with multiple techniques and tons of supplies. Once in a while I feel like I am using everything + the kitchen sink.. Ever spend a ton of time and supplies on a card and then wonder if you should have stopped 5 steps ago? It was difficult to not add something shiny on this card, but it was important to keep the recipient in mind.


First, I blended some Distress Inks on Strathmore Bristol 300 Series Paper. 
Then, I used a feather die set from Paper Smooches to cut out my feathers.
To create the "HB2U", I use dies from 2 sets: My Favorite Things' Stitched Alphabet, and My Favorite Things' Stitched Numbers on black cardstock. The stitching is a really nice detail in person and I use these dies A LOT. "HB2U" is young and modern but if I wanted to be super-cool I might have even included the hashtag (#) symbol :)
There's always next time, right?

I placed a piece of 4.25in x 5.5in. sky blue paper inside an embossing folder and ran it through my die-cutting machine. I believe I got this folder at A.C.Moore during a 50% off coupon day. Follow the directions for your machine: you want to make sure you don't break/damage your equipment. Folders are a great way to add a lot of texture to a card.. and they are inexpensive, fast and easy!

Anyway, the final steps were the most satisfying- putting it all together! I cut a piece of card-stock to 11in x 4.25in. Then, I used a scoring buddy to score it at 5.5in. That way, the card bends nicely. That is how I make many of my 'card-bases'. I used a tape runner to glue the embossed blue sheet to the front of my card-base. Then, I glued the feathers and HB2U in place using Lawn Fawn's Glue Tube. Let it dry, pop that bad boy in the mail and you are good to go! (or add it to your card stash and don't tell anyone...)

Have an awesome day and thanks for checking out my page!

Challenges: 


Thursday, August 30, 2018

Arctic Fox Shaker Card and BONUS

Hi gang, 
I really love my Arctic Fox Shaker Card: It is simple, masculine, and the fact that it is a shaker-card makes it very dynamic.


First, I blended a 4.25in x 5.5in piece of Strathmore Bristol 300 series paper with a few unusual colors. Many of the cards online are bright and while I still love bright colors, I wanted something to convey a muted, masculine snow-scene. The fox looks a bit more white in real life and pops out, but what can ya do lol. I really like Weathered Wood Distress Ink as it is a nice shade of blue-gray, so I went to town with that on the bottom of the paper. Above that I used Simon Says Stamp's Cloudy Ink and Simon Says Stamp's Lake Shores. For the sky, I used my very first Distress Oxide Ink: Broken China. Yeah, that's right, my FIRST Oxide Ink.. it was pretty awesome.

I also got my metal dies ready and did a test on some craft foam. By taping a piece of purple low-tact tape to the dies, I was able to lift them all up at the same time and keep them together. I used this technique to cut the paper in the same exact configuration as the foam. (note: I don't have the sticky adhesive sheets, so I really had to get crafty)

I really wanted an arctic fox, but red and orange are some of my other favorite colors, so I figured I might as well make a twin card!


I cut the paper and put the nice side face down on the table. I used some sticky adhesive to adhere Acetate to the back; I just needed enough to cover the cut-outs. Then, I adhered the foam for “walls” and filled the cut-outs with all kinds of fun bits. I used Orange Prills, glitter, tiny beads from Recollections and Little Things’ sequins. You want to leave some room so the pieces can move about. Then, I glued the foam and placed a black 4.25in x 5.5in piece of cardstock on the back. This seals it up! The beads are trapped by the foam walls, black paper, and the acetate. 


The final step is adhering the whole thing to your card base. 
Hope you enjoy my two cards! 
Which do you like more? Red or Blue? 


Tip: You don’t have to buy acetate, you could use a cut up sandwich bag or some wrapping from something you buy. Acetate is a bit stronger and therefore less wrinkled. Keep it in a bin so it doesn’t get too dusty, or clean it before using it on a project. If you have any teacher friends, see if they will bring you some transparency-sheets, I believe that works too.

Please come back again!
-John 

Challenges: 

Monday, August 20, 2018

Dim Sum Christmas Tree

I decided to try and enter some challenges. I went for a fun, clean, Christmas card with minimal embellishments.


I feel like I made a winner because who doesn't like Dim Sum?

First of all, I love dumplings. I live near China Town and frequently hit up a few different Dim Sum places. They are all so, so, so, so good. I don't really have a favorite, and it feels like I just roll around from place to place some weekends. The concept of this card was that some people order chinese food on Christmas and I have always wanted to do that- not that I don't like my mom's Christmas ham, I just really like chinese food too. 

I also like using my small stamps to make larger images. 

The little dumplings from this Mama Elephant stamp are perfect, and the sentiments were funny- I had to use it to make my Christmas Tree.

I took three pieces of tape and removed some of the stickiness by putting it on the table and pulling it off. Some people might use their arm, but since I have hair there, I found the table works just fine for me. Art should be a fun experience right? I don't want to start my project with my eyes welling up.

Anyway, I took the 3 strips of tape and made a triangle on a piece of paper, forming my tree. I stamped the food images using the Mama Elephant Dim Sum Fun set all over. I also used some fortune cookies from Mama Elephant's Lunar Extras stamp set to fill in some of the gaps. I thought about masking some images, but I tried to follow the clean and simple challenge directions. 

The sentiment: "Dim Somebody Say It's Christmas?" is from two sentiments that I pieced together.

I colored the images using a few Copic Markers. I removed the tape and the green marker bled underneath a bit. It actually didn't look horrible and I thought about keeping it because it resembled the jagged edge of a real pine tree, but I thought it would look better if I trimmed it down into a perfect triangle. I also cut out my "star": a tasty little rice ball, and glued it on top. 

I stamped the wooden tray and colored with brown copic markers to make it look like an authentic bamboo steamer. I think it makes the perfect trunk for my Christmas Tree. 

Thanks for checking out my idea!

Challenges:

Tropical Birthday Card

Hi, I decided to make my sister a birthday card. She just got married in Florida, so I knew she would like this tropical stamp from WPlus9. I worked through some art problems and was able to pull it together- just in time!
First, I did the background. I blended Wild Honey and Carved Pumpkin Distress Inks on Strathmore Bristol 300 series paper. I then splashed some water and blotted it off with a paper towel, causing this cool effect.
  I stamped the image using Hero Arts Intense Black Ink because it is Copic-Marker-Friendly. The markers I used were V04, V06, V09, and a bit of BV08 for the purple flowers. I used YG13, G07, G17 and G29 for the leaves. I used R08, YR07, PR09, and YR14 for the main flower. I plan to add a few more colors to my collection, but was happy with how it turned out.

Disaster! I had some major leakage while I was coloring and I learned that it could be from uneven pressure in the copic marker. So I took off both caps at the same time to equalize the pressure. I didn't have issues after that. I decided to cut as close as I could to the stamp to hide some of the errors. This took a while but was worth it. I used a colorless blender and then a White Uni Ball Signo Broad Pen to color in some of the dots of the leaves. 
To match the background, I used Y11 to color in the spots that were just too tiny to cut. 
I coated the edges of the bouquet with a black Tombow pen to give it a finished look. 

I used a stitched rectangle die from Simon Says Stamps to cut my background down a bit. I will save the outside border for another piece in the future. 
            
I took a lot of time to cut up the Simon Says Stamp foam tape because I am all about that pop-up life. The 3-D effect adds a lot and I wanted to make sure the flowers didn't get crushed in the mail. I would be lost without my EKTools Tweezers because I always struggle to get the backing off of the foam tape.
I used an anti static tool on my green sentiment strip to prep it. I then stamped the sentiments with VersaMark Ink, used Fine White Embossing Powder to coat, heat-set the words until they were shiny and popped them up on the card.
                            
I used some awesome Washi Tape on the bottom of the inside of the card. It is one of my favorites. I used a Wink of Stella Pen on the hibiscus flower to add some shine. 
                            
Think I pulled it together in the end? 
Thanks for stopping by!
-John

I submitted this to a challenge:


Wednesday, August 15, 2018

Blob of Clay----> Pure Awesomeness

Welcome to my page and thank you for your support!
I hope to make you smile and say, "that is some cool paper art!"
This blog is my own personal big ol' lump of clay... I plan to keep chipping at it and make something AWESOME. 

I've always enjoyed art; when I was a kid, playing with paper was cheap and fun. I would spend hours on my origami projects and make all kinds of homemade cards and gifts. My fingers are a little bigger and a little less nimble now.... While I still enjoy origami, I have thrown myself into other styles of paper-art, especially card-making. I created this blog to keep track of my work and share some tips along the way. 

While artists always respect and appreciate each other's work, the card-making community is especially kind. The paper-crafting field has really grown by leaps and bounds and I'm happy to be a part of it.

I also love animals, movies, theme parks, nerdy board games, even nerdier video games, and weirdly enough, marathons. Feel free to comment on anything and I'll likely go off on a fun tangent.

Thanks again for stopping by!

-John 
INSTAGRAM: @CoolPaperArt